Meter Course
In order to Solo you need a Meter. The Meter Course (and/or Solo Meter Course) teaches you how to use the Meter. A full Meter Course can be found here: www.fzint.net/downloads/index.htm or see Links. But most of it is not necessary for Free Solo Processing so here is a short version:
On/off/test: A switch to turn the Meter on and off and to test the battery. Some Meters do not have an on/off switch, as they use so little electricity that they are always on. Some Meters also have a "transit" position, it short circuits the Needle coil so the Needle moves less during transportation.
Battery: Some Meters have re-chargeable batteries, some have normal batteries. Some Meters can be used while re-charging from the mains, some can't. Some Meters has to be switched on before they can be re-charged.
Tonearm: The "Tonearm" is a knob that can be turned right and left. It is used to keep the Needle inside the needle scale on the Meter. The name "Tonearm" may come from the idea that it supposedly shows the persons "tone" as high or low resistance.
The Tonearm basically shows the electrical skin resistance in Ohms (when the Needle is at the 'set' position on the Needle scale). But for practical reasons it has a scale that goes from 0.5 to 6.5. (It is easier to deal with 6.5 than 1,000,000 Ohms.) An automatic Meter doesn't have a Tonearm. Instead is has 1 or 2 push buttons which put the Needle back to the 'set' position when pressed, and the TA-position is shown in an electronic display. Or in fully automatic mode the Needle automatically goes to the 'set' position every time it reaches the scale ends.
Needle: The needle shows tiny changes in the electrical skin resistance. If you hold the Electrodes in your hand and look into your Mind you may see that the Needle moves depending on what you look at.
Sensitivity: This is a turnable knob that regulates how much the needle shall move. At low sensitivity the Needle only moves a small distance, for example if the skin resistance drops from 20.000 Ohms to 19,500 Ohms then that may give a 1 inch movement of the Needle to the right, while at higher sensitivity it would make the Needle move 3 inches.
Sensitivity Booster: Some Meters have a Sensitivity Booster with 2 or 3 steps. It makes the Sensitivity knob even more sensitive.
Trim: This knob is turned right or left to adjust the 2.0 Tonearm postion to 5,000 Ohms. See below how to do it. Some Meters trim automatically and so do not have a Trim button.
TA-counter: It counts the downward motion of the Tonearn (TA). If you move the Tonearm from 5.0 to 3.5 then the counter will add 1.5 to the count. Moving the Tonearm from 3.5 to 5.0 will not add anything to the counter. The TA-counter has a push button to zero the counter.
Electrodes: Also called cans, are connected to the Meter via a wire and plug. The cans should be about 5.5 cm in diameter. Ordinary tin soup cans may do. They must be without paint or paper of course. Renew them if they get rusty. The Meter sends a tiny current through the electrodes in order to measure skin resistance in your hand. In Solo Processing you hold both cans in one hand, in order to have the other hand free for operating the Meter. For easy use in Solo you can glue them together permanently. Make sure there is no electrical connection between them of course.
Clock: Some Meters has a clock showing the time and often the date too. There are usually 1 or 2 push buttons to show time or date and to set time and date. It may work by pushing for some seconds or pushing fast 2 times.
The first step with your Meter is to read the material that may come with it. And touch your Meter and turn the knobs to get acquainted with it. The very first Meter Drill is supposed to be: Touch your Meter. Thank you. Let go of your Meter. Thank you. 1, 2, 1, 2 and so on. It works nicely if you have the time. Stop when you feel good about it. Or skip it.Setting up your Meter.
1. Take the lid off the Meter and
connect it on the far edge of the Meter with the catches, so the Meter can stay
tilted on the table. (Some Meters don't use the lid for that, some have a leg in
the bottom to swing out, etc.)
2. Take the electrode plug out of the Meter,
if in. (This connects an internal 5,000 Ohms resistor in some Meters.)
3.
Turn the Meter On with the on/off switch (if available).
4. Turn the
sensitivity knob to full.
5. Set the Sensitivity Booster in the lowest
sensitivity (if 3 positions, if 2 positions put it in the highest. Or read
instructions for your particular Meter. Some Meters don't have a Sensitivity
Booster.)
6. Turn the battery test knob to test. The Needle should hit fairly
hard against the right stop. If it doesn't reach the right stop the battery
needs re-charging or replacement. Some Meters have a battery scale, if so then
use that to see battery condition.
7. Position the Tonearm at 2.0.
8. Turn
the Trim knob (if available) until the Needle is at the 'set' position on the
Needle Scale. This ensure that 2.0 = 5,000 Ohms.
9. Connect the electrode
plug to the Meter. With its lead connected to the electrodes.
10. Zero the
TA-counter. If any.
Holding the electrodes.
If your hands are dry then put some
cream to make them normal humid. If your hands are sweaty then wash and dry
them. If your hands are cold then warm them. If too dry and cold you may handle
it by closing them around your mouth and breathe warm humid air on them. Also
warm the electrodes if necessary (for example under a lamp, radiator, or body
heat). Finger rings should be taken off as they can make false reactions on the
Needle if not in steady contact with the electrodes.
Place the 2 electrodes in one hand (right hand if the Tonearm is at the left side of the Meter). Two fingers on one electrode, two fingers on the other electrode, and your tum on the opposite side of the cans.
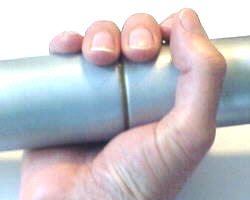
Hold the electrodes with a not too hard grip and not too loose a grip. To ensure good skin contact without getting tired in your hand even if you have to hold the electrodes for 1 or 2 hours. Place your arm at the table or at your lab, as most comfortable.
Training in handling the Tonearm.
With the Meter set up and
both electrodes in one hand. First you use low sensitivity.
Turn the Tonearm
to place the Needle at 'set'.
Loosen your grip on the electrodes.
Move the
Tonearm to place the Needle at 'set'.
Tighten your grip on the
electrodes.
Move the Tonearm to place the Needle at 'set'.
Continue this
until you can quickly put the Needle back to 'set' without over-compensating.
(So the TA counter doesn't count more than it should.)
Now increase
Sensitivity and do the above again. In the end you should be able to operate the
Tonearm fast and precisely even at maximum Sensitivity and maximum Sensitivity
Booster set.
Body motion Hold electrodes in one hand. Put the Sensitivity high enough to see Needle motion. Notice that body motions like yawning, breathing deeply, coughing, moving the body around, changing grip pressure will all make the Needle move, usually to the right (fall). These Needle motions are false Needle motion. In Solo Processing we are only interested in Needle motion caused by contacting material in the Mind.
Needle actions.
There are about 18 different Needle actions.
In Free Solo Processing only about 2 are important. The rising needle and the
falling needle or fall. Rise (needle moving left) = higher electrical
resistance. Fall (needle moving right) = lower electrical resistance.
1.
Rising Needle. Slow or fast.
2. Falling Needle. Slow or fast.
3. A Fall.
Needle moving right 1/4 to 3 inches or more.
4. Unmoving Needle. Stuck.
5.
The needle floats idly back and forth (F/N). Release.
6. High speed rise 0.5
to 3 inches. Like a shot.
7. Needle swings back and forth 0.2 to 2 inches
about 5 times per second, same distance every time. (Its a Being who can't make
up his mind about whether to stay or to leave.)
8. The Needle moves
completely crazy up and down 3-5 times per second, hitting both ends of the
Needle Scale. Hot stuff.
The more wild Needle motions just indicates you have hit a heavy area in your Mind. That's fine. No need to worry or do anything special. Just continue Solo.
A rising needle means non-confront. You are approaching something you or others don't want to confront.
A falling needle (usually) means confront and erasure.
An Instant Fall is sometimes useful. It happens at the exact end of a thought. Example: "Is there a problem?" An instant fall at the exact end of "problem" indicates there may be a problem available (for erasure). An instant fall happens within 1/10 of a second.
Sizes of Falls:
No reaction: x.
Tick : 0 to 0.25 inch (or 0 -
0.5 inch).
Small Fall (sF): 0.25 to 1 inch (or 0.5 - 1 inch).
Fall (F): 1
to 2 inch.
Long Fall (LF): 2 to 3 inch.
Long Fall Blow Down (LFBD): more
than 3 inch, needle goes outside scale.